sexta-feira, outubro 05, 2012

Vestido coral / Coral polka dot dress


Este vestido foi o meu projecto de costura destas férias. Ia ter dois casamentos em Setembro e ainda não sabia o que ia vestir ou se ia comprar ou fazer eu mesma (apesar de, para mim, casamentos serem sempre um bom pretexto para pôr mãos à obra...) A decisão foi tomada quando vi este tecido no Planeta dos Tecidos em Torres Vedras. Fiquei completamente apaixonada: eu adoro tecidos às bolas e achei que esta era uma combinação de cores pouco usual - bolas bege em fundo coral - por isso decidi que ia ter de fazer qualquer coisa com ele.
Optei por um modelo simples de inspiração "retro" pois o tecido já é vistoso por si mesmo. Este tipo de vestidos pede um saiote para dar volume e o tule bege a aparecer sob a saia é mais um detalhe de que eu gosto (vi também em algumas colecções este Verão, como na da Naf Naf...).
Por fim, tive uma sorte incrível com os acessórios (em parte porque o coral foi também a tendência desta estação) e consegui encontrar o cinto e os sapatos que combinavam na perfeição.

This dress was my sewing project this summer. I had two weddings last September and did not know what to wear or if I would buy it or do it myself (although weddings are always a good reason to sew something). I made a decision when I saw this fabric at the shop, I fell in love with it, I love polka dot fabrics but I found this a quite unusual combination of colours: beige and coral.
I chose a simple pattern with a “retro” touch because the fabric is flashy enough. The petticoat in tulle is another detail I love (which I also saw in some collections this summer like Naf Naf's…) 
Finally, I was lucky enough to find exactly matching belt and shoes! 

Modelo: Burda Couture Facile Printemps/Été 2009 - vestido 5A
Pattern: Burda Easy Fashion Spring-Summer 2009 - dress 5A


E pronto, no meio de alguns dias de descanso e de outros dias atribulados a tratar de assuntos da obra, lá consegui ter o vestido pronto a tempo... acho que já me habituei a trabalhar sob prazos apertados. :)
Uma nota para a minha máquina corta-e-cose, que foi uma óptima aquisição (ver aqui) e me permitiu fazer acabamentos de profissional. Estou muito satisfeita com o investimento!

I must make a note about my overlock machine which was a great acquisition and allowed me to obtain professional finishings. I'm really pleased, it's worth every euro! 


Etiquetas:

domingo, novembro 07, 2010

Vestido laranja (inspiração Chanel) / Orange dress (Chanel inspiration)

Fazer um vestido para um casamento em pouco mais de quatro dias, tem muito que se lhe diga. E quem é que decide fazer roupa para um casamento a poucos dias do mesmo? Bem, a culpa foi dos sapatos. Eu já pensara em levar calças mas quando comprei os sapatos e experimentei-os com as calças, não gostei de os ver tapados por elas... Então decidi que ia levar um vestido. Mas nas lojas não encontrei nenhum vestido adequado. Opção: fazer! Isto foi no fim-de-semana anterior ao do casamento.

Make a dress for a wedding in just over 4 days is a little bit crazy. And who decides something like that? Well, blame the shoes. I had already decided to wear trousers but after I bought the shoes I didn’t like to see them with the trousers which were covering them, so I changed my mind and decided to wear a dress. But I didn’t find any I liked on shops, so I had to do one myself. This was the weekend before the wedding’s.

Modelo: Burda 08/2009 # Mod. 128
Tecido: 1,70 m de cetim laranja (loja: Planeta dos Tecidos, Torres Vedras)
Pattern: BWOF 08/2009 #Patt. 128
Fabric: 1,70 m orange satin
Decidi-me por este modelo da Burda depois de ensaiar as pregas da saia em pano cru e de ter gostado do efeito.
I chose this pattern after I’d essayed the skirt ruffles on some fabric and had liked the effect.

No dia seguinte, uma Segunda-feira, fui comprar o tecido. Na Terça-feira, que felizmente era o feriado do 5 de Outubro, meti mãos à obra. Depois foi durante o resto da semana, a seguir ao trabalho. No Sábado, véspera do casamento, foi uma maratona mas consegui. Tenho a agradecer à minha mãe que me ajudou ao fazer as bainhas das mangas e da saia, o que me permitiu adiantar outras coisas.

The day after, a Monday, I bought the fabric. Tuesday, fortunately was an holiday, so I could sew all day long. I worked the rest of the week after arriving from work. I had to thank my mum who helped me by sewing the sleeves and skirt's hems, what allowed me to take advance on other things.

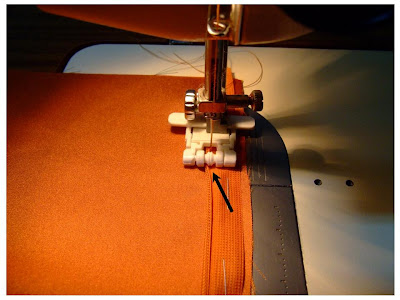
O fecho invisível foi uma das partes mais gratificantes deste projecto. Esta foi a 1º vez que usei este pé calcador especial para fechos invisíveis. Já uma vez tinha cosido um (aqui) mas usei um outro pé acessório da máquina que, apesar de também ser indicado para coser fechos, não permite um resultado tão preciso. A parte central do acessório mantém o fecho afastado da agulha permitindo que esta cosa o mais junto possível do fecho sem o atingir. Podem encontrar em retrosarias, este é da Prym e é universal, vem com 3 pés diferentes e é só escolher o que se adapta à nossa máquina.

The invisible zipper was one of the most rewarding parts of this project. This was the first time I used this special zipper foot. I had already put one once (here) but I had used another accessory foot which, even though it was also indicated for sewing zippers, it does not allow a result as accurate. This is from Prym and is universal.


O vestido foi forrado na parte de cima. Foi-me bastante útil a tesoura zig-zag para recortar o forro e chuleá-lo em simultâneo.

The upper part of the dress was underlining. It was quite useful the zigzag scissor to cut the lining and give it the finishing simultaneously.


A parte mais desafiante foi, sem dúvida, embeber as mangas. Isto não é mais do que aplicar as mangas ao corpo. A questão é que a manga é sempre ligeiramente maior do que a abertura no corpo, sendo necessário franzir ligeiramente a cabeça da manga para que ela caiba nessa abertura, mas ao coser não se pode deixar a manga formar franzidos. Parecia-me tarefa impossível mas descobri com grande alívio que não é.

The part most challenging was undoubtedly setting in the sleeves. This is attach the sleeves to the armhole. The question is that the sleeve cap is always larger than the armscye, so it’s necessary gather the sleeve cap fabric up to it matches the armscye, but the stitching should be very careful not to form ruffles! It seemed me impossible but it isn’t as I found out with great relief.


O cinto foi feito com fita de gorgorão (4 cm da largura) forrada com o avesso do tecido, que é castanho. O tecido foi colado à fita com cola para tecido da Gütermann.

The belt was made with grosgain ribbon (4 cm width) lined with the underside of the fabric (brown). It was glued with textile glue from Gütermann.


Pormenor da presilha para o cinto, na costura lateral (feita com linha de coser):
Belt loop’s detail on side seam (done with sewing thread):

Acessórios


Eu simplesmente adoro chapéus, por isso não perco uma oportunidade de usar os que tenho, e os casamentos são óptimas ocasiões para o fazer. O chapéu que considero mais elegante para usar numa cerimónia destas é a capeline, que é este modelo de aba larga.
Tenho esta capeline de feltro castanho que conjugava-se perfeitamente com os tons do vestido. Para enriquecer o conjunto decidi fazer uma flor para o chapéu no tecido do vestido.

I simply love hats so I don’t miss an opportunity to wear those I have and weddings are perfect occasions to do it. The hat I find the most elegant for such occasion is capeline. I have this brown felted capeline that matches perfectly the colours of the dress and I decided to make a flower to put on it in the same fabric of the dress.

Para fazer esta flor usei uma técnica que descobri na Internet (depois de muitas tentativas infrutíferas para fazer uma flor de cetim normal). Fiquei muito surpreendida com a técnica e com o resultado. Consiste em recortar círculos de tecido de vários tamanhos e chamuscar os bordos de cada círculo com a chama de um isqueiro ou uma vela (eu recomendo usar uma vela em vez de um isqueiro, pois permite segurar o tecido com as 2 mãos e não se corre o risco de queimar os dedos com o metal quente do isqueiro). Depois é só sobrepor os círculos e coser (no meio é um botão forrado).

The flower was made with a technique I discovered online (after many fruitless attempts to do a satin flower). I was quite surprised with the technique and the result. You just have to cut fabric circles in different sizes and then very slightly melt the edges with a lighter or a candle (I recommend a candle instead of a lighter because it allows you to hold the fabric with both hands and there is no risk of burning your fingers with the hot metal of the lighter). Then you just need to overlap the circles and attach them together (in the middle I put a lined button).

Clutch (tipo Chanel) em bege dourado:
Golden beige clutch (Chanel type):


E estes são os sapatos que deram origem a isto tudo...
Bem, não acham que valeu a pena?

And these are the guilty shoes...
Don’t you think it worth it?


(Nota: Esqueci-me de tirar fotografias com o telemóvel no casamento para publicar aqui, quando tiver fotos oficiais actualizo!
Note: I forgot to take pictures on the wedding with my cell phone to publish here, when I'll have official photos I update!)

Etiquetas:

segunda-feira, outubro 26, 2009

Túnica em cetim bege / Beige satin tunic


Esta túnica foi feita em contagem decrescente para levar a um casamento a que fui no dia 4 deste mês. Costurei intensivamente ao longo de uma semana, depois de chegar do trabalho, e consegui terminá-la a tempo! O Sábado, véspera da cerimónia, foi passado entre a máquina de costura e a tábua de passar a ferro mas valeu a pena. Não tive tempo para chulear todos os valores de costura, por isso, pelo sim pelo não, levei uma tesourinha na mala para poder cortar algum fio indiscreto que surgisse. ;)

For this blouse I had a deadline! I had just one week to sew it because I wanted wear it on a wedding I went to this month. I sewed intensively over the week, at night, and I managed to finish in just in time! I hadn’t time to overcast all SAs, so I took in my purse a little scissor to be able to cut any incautious thread that arise. ;)


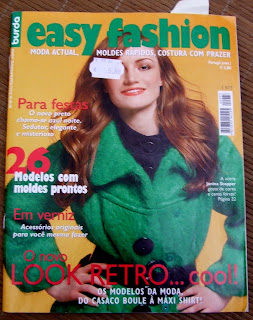
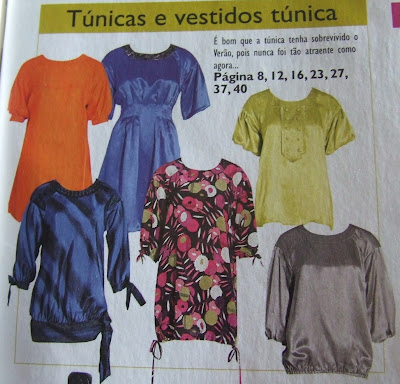
Este modelo é uma mistura de vários modelos da Burda Easy Fashion Out/Inv 2008.
O tecido já o tinha comprado o ano passado, na Feira dos Tecidos, com ideias de adaptar um destes modelos, inspirada pelas túnicas e vestidos em cetim da colecção de Inverno do ano passado da Lanidor, muito semelhantes a estes. Quando pensei na roupa para este casamento, lembrei-me imediatamente deste cetim para fazer uma túnica que fosse elegante e sofisticada q.b.
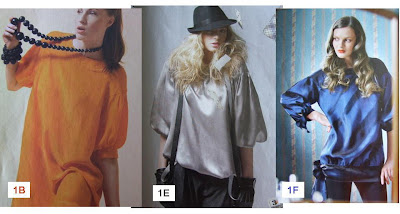
Assim, combinei o modelo 1E com as mangas do vestido 1B e com a faixa de atar do 1F. Também reduzi o comprimento da túnica para evidenciar mais o cós e a cintura. Acho que ficou muito elegante e dou o mérito ao tecido e à cor.

This pattern is a mix from three patterns from Burda Easy Fashion Fall-Winter 2008. I combined the 1E pattern with the sleeves from 1B and the waist tie from 1F. I also reduced the height. I think it turned out very elegant due to the fabric.
Foi a primeira vez que trabalhei com cetim e foi mais fácil do que eu pensava. Apenas a gola me deu mais trabalho: tratando-se de uma costura curva e sendo o tecido escorregadio, à medida que ia cosendo, a parte de baixo criou folga e fez alguns refegos, pelo que tive de descoser e voltar a coser. Sugiro que não cosam tudo de uma vez e de tempos a tempos verifiquem como está o trabalho. Mais vale interromper o pesponto e retomá-lo, do que coser tudo de uma vez e no final descobrirem que têm de descoser… Uma nota também para a espessura da agulha: sendo um tecido fino e delicado convém usar uma agulha fina, eu usei uma 75 com bons resultados (quando era preciso descoser, os pontos não ficavam marcados).
It was my first time working with satin and it was easier than I expected. Only the neckline took me a little more time: because it was a rounded seaming and the fabric is slippery, some crimps arose. I had to unstitch the neckline and stitch it again. It’s highly recommended stop once in a while to see if everything is ok, better than notice that something is wrong just in the end… Pay attention to the needle size: for a thin and gentle fabric like this you should use a thinner needle (I used a 75).


Pormenor da abertura lateral do cós / Waistband overture detail

Etiquetas:

segunda-feira, setembro 14, 2009

Blusa em bordado inglês/ Eyelet blouse

Adoro esta blusa. É um modelo de execução bastante acessível, que só me demorou mais a terminar devido à aplicação das vistas, já que nunca tinha aplicado vistas deste género. O tecido é bordado inglês 100% algodão e quando o comprei pensei numa camisa ou num top, mas quando vi este modelo ficou decidido.

I love this blouse. Its execution is very approachable, and the thing which took me more time was the front facing just because I never had applied facing of this kind. Initially, this fabric was bought to make a blouse or a top but when I saw this pattern I decided it was it.
Modelo: 105 - Burda 06/2007
Pattern: 105 - BWOF 06/2007

O galão/ The ribbon
Um dos pormenores de que mais gosto. Não encontrei o galão de bordado inglês que sugeriam em vermelho e na retrosaria sugeriram-me esta alternativa. Acho que resultou perfeito. Aplicado à mão, de forma muito simples, antes de fazer o porta-elástico.
One of the details I like most. I didn’t find the original lace trim in the color red, so at the haberdasher they suggest me this one. I think it’s perfect. Hand-stitched, very neat, before apply the elastic.


O porta-fita/ The casing
Gosto muito deste pormenor: a passagem para a fita de cetim é feita a partir dos valores de costura da junção das partes superior e inferior, no avesso. O porta-elástico é feito da mesma maneira.
The casing for the satin ribbon is made with the own SAs on the wrong side, as well as the casing for the elastic tape.


As casas para os botões/ The buttonholes
As casas de botão foram feitas com um cordão que encontrei na mesma retrosaria. Deu algum trabalho distribuí-las e cosê-las de modo igual entre si. Foram colocadas entre a frente direita e a respectiva vista, cosendo tudo junto.

Made with a type of ribbon I found in the same haberdasher. It was a little bit challenging placing them evenly together. They were applied between the front facing and the front, stitching all together.


As vistas/ The front facing
Foi a parte que me fez perder mais tempo porque não sabia muito bem como aplicá-las e fazer o acabamento. A minha pesquisa não me orientou muito e acabei por decidir fazer assim, penso que com bons resultados. São aplicadas dobradas, de modo a que a vista oculte o avesso. O acabamento acabou por ser simples: na falta de uma máquina corta-e-cose, chuleei com um ponto ziguezague ao longo da ourela, a parte superior foi cosida com pontos invisíveis à mão e a parte inferior foi cosida juntamente com a bainha.
The part which took me more time, because I didn’t know how should apply and finish it. My research didn’t help me very much, so I had decided to do it this way, successfully I think. They are applied folded, so they cover the reverse of the piece. The finishing is simple: zigzag stitch close to the selvage (in the absence of a serger), the upper end was sewed with invisible hand-stitch and the bottom was sewed together with the hem.


A bainha/ The hem
Dobra-se, assenta-se a ferro, faz-se um ponto ziguezague rente à dobra e corta-se o excedente no avesso. Acabei por fazer a bainha na máquina em velocidade “à mão”, para garantir o controlo da agulha rente ao tecido, e até acabou por ser mais rápido do que eu estava à espera ;).
It’s folded, pressed and applied a narrow zigzag stitch close to the fold, then the surplus at the wrong side is cut.

Uma nota para as pregas: pensava que eram pregas simples e só depois de já ter cosido as duas partes é que reparei que na foto do original elas são cosidas. Acabei por deixá-las assim, apenas vincadas, mas é um pormenor que vou ter em atenção da próxima vez.
Outra nota... Acidentes acontecem. Cuidado com os bordados do tecido! Quando estava a abrir uma das casas de botão para a fita de cetim com o acessório de abrir casas de botão, encontrei um ponto de resistência no tecido, fiz mais força e opsss!, um rasgão! A sorte foi que foi num dos passos iniciais e deu para substituir a frente rasgada sem muito trabalho.

A note for the pleats: I taught they were simple pleats and it was only after I had sewed I realize that they should be also stitched. It’s a detail I should be aware for the next time.
Another note: shit happen! Beware of the fabric’s random bulkiness in this kind of fabric. When I was opening one of the buttonholes that drive the satin ribbon out of the casing with a proper tool, I found a resistance in the fabric, had forced it and upsss!, it tore a hole! Fortunately, it happened at the beginning of the work and I could replace the torn part without to much work.


Adoro este modelo, pois adoro este tipo de decotes. Nota para a sua versatilidade, pois graças ao elástico pode ser usado assim...

I love this pattern, both for the running as for the outcome, because I love this kind of neckline. Note for the elastic detail, whereby it can be used like this...

...ou assim:
...or like this:
Volto a dizer que a execução é muito acessível e resulta muito bem. Pormenores como o galão, os botões, a fita de cetim, dão-lhe um toque romântico. Talvez aproveite este molde para fazer um vestido.
I say again that the execution is very approachable. Details as the finishing ribbon, the buttons and the satin ribbon give it a romantic look. Maybe I'll use this pattern to make a dress.

Etiquetas: